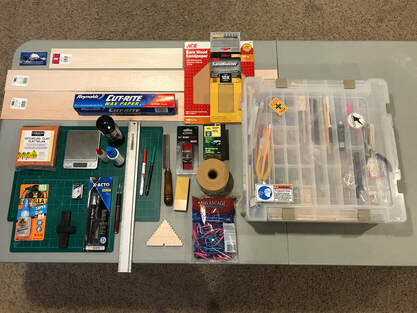
 The items we use to build our balsa wood gliders from scratch! The items we use to build our balsa wood gliders from scratch! Hello, everyone! We have had questions regarding the tools and materials we use to build our balsa wood catapult gliders. I would like to give you an overview of the items we use all the time. Below is a fairly comprehensive list, some essential and some not so essential. The great thing is, it really doesn't cost that much to get into this hobby. You should be able to find the handful of tools and materials you need, a with a few sheets of balsa, you're off and running! So, grab a cup of joe and let's go! Workspace First and foremost, you're going to need a good place to work-- preferably somewhere you will have plenty of elbow room for a dedicated workstation. I have allocated space in my basement which has a nice environment for building. It has plenty of overhead lighting and a nice comfortable atmosphere. Since I am in the basement, I have a dehumidifier which serves the main purpose to keep my basement dry and it serves a second purpose to also helps to keep my balsa dry. Maybe you don't have a basement. Perhaps, you have an area in your family room or a guest bedroom in your house you can take over. Maybe, the garage or even the dog house is your only option. Whatever the setup, be sure it's in a safe location, away from rambunctious pets, and very curious (and grabby) young toddlers. We wouldn't want them getting into the super glue and sharp knives, right? (Ok, strike the dog house idea, that is a horrible option as a place to work.) 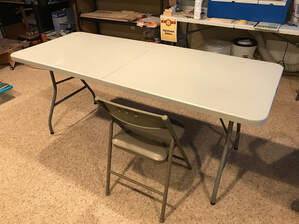 A great work table A great work table Table You need a fairly sturdy table-- one that is spacious and flat. You're going to sand your wings on it so it needs to be strong with no wiggly-jiggly or wobbly-bobbly legs. It is important for it to be a dedicated work table and it certainly should NOT be your nice dining room or kitchen table. I recommend getting one of these plastic banquet tables. I purchased a six-foot table from Target that cost me around $40+. What's great about these tables is that they are pretty sturdy and they fold and store easily. Plus, if anything bad happens to it, it's a work table... so, your mom will be happy you didn't destroy the dining room table, your dresser, the wooden floor, or anything else! So, heed my advice or you might have to evict Fido from his dog house as your place to work! 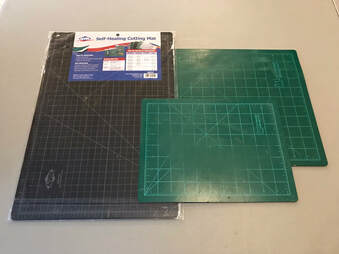 My new and heavily used cutting mats My new and heavily used cutting mats Cutting Mat Ok, now that you have your nice (inexpensive) table to work upon, you'll still want it to last a long time. A cutting mat is essential as it protects your table from sharp blades and it protects your blades from the hard table surface. Since I make a lot of cuts that are 12 inches long, I prefer cutting mats that are at least 18 inches long to give me plenty of room to work upon so my knife is always cutting on the mat. They come in various sizes and can be found at your local hobby and craft stores. Find a size that works for you and one that fits your budget! 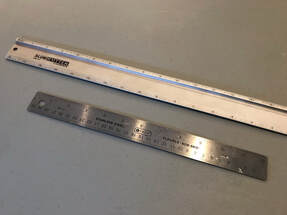 Non-slip metal rulers Non-slip metal rulers Metal Ruler (Straight Edge) A metal ruler is going to serve as two tools in one. It will be your primary measuring device and your guide for making straight cuts. Here are the three main important features of a good ruler: 1) It should be made of metal! This is very important if you are using it as a cutting guide. It will be more durable and your blade will not harm it. 2) Find one that has both inches and centimeter scales. This makes it much more versatile... you know, just in case the U.S.A. decides to go metric. (Yeah, right! That'll never happen!) And finally, 3) Find a metal ruler that is completely flat with something soft on the back side (e.g. rubber, cork, or foam.) Why? Well, when you lay the ruler on your balsa wood and apply pressure to hold it in place, it will stay in place during your cutting. I have an 18-inch ruler and it has served me quite well. Remember, the saying, "always measure once and cut twice" -- er... wait, what?... That's not right... reverse that! 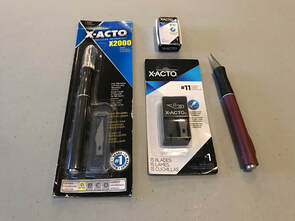 X-ACTO X2000 with #11 blades X-ACTO X2000 with #11 blades Hobby Knife Here you have a wide variety of choices for cutting implements and, in the end, it comes down to personal preference. Some factors in play might vary from how it feels in your hand, how it performs when it cuts, and/or the cost of the tool and blades. For me, I like a good hobby knife over a utility knife. I really like the X-ACTO X2000. It is inexpensive (less than $10) and it has a very nice thick rubber barrel (handle) that fits nicely in my hand. You can certainly find cheaper X-ACTO type knives with the thinner metal handles, but I like comfort when I dangerously wield knives. I use the standard No. 11 blades which have a very pointed tip-- which is great if you have to make curved cuts. Or, if you like, a simple utility knife can get the job done. The popular ones have the retractable blade where you can break away the tip to get a new sharp edge. I know other hobbyists who prefer just a simple single-edged razor blade. Note, this is NOT the same as double-edged razor blades! (Trust me, you'll only make that mistake once... and now, I can only count to 9 before I have to take off my shoes.) Whatever knife you choose, be sure to be cautious and always use a sharp blade-- for you may be risking injury when using dull blades! 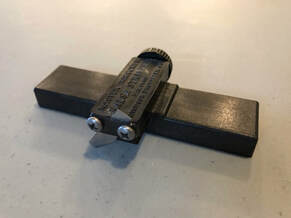 My favorite tool! My favorite tool! Balsa Stripper (Balsa Strip Cutter) If there is a favorite tool in my arsenal, it's gotta be this one! I love this thing and I will say, hands-down, this will save you time and money! So, how does it work? It has its own adjustable guide and cutting blade that you use to cut off strips of balsa (up to 3/4 inch wide) from a sheet of balsa (up to 1/4 inch thick.) Sure, if you need strips of balsa pre-cut, you can find those at the hobby shop, but you will pay a premium price for each strip. However, it's way cheaper to buy a larger sheet and cut your own strips. This tool is perfect for cutting fuselage strips! You can find these at your local hobby shop (or online) for about $10 or less. The most common brand is "Master Airscrew." (Tip: If you decide to search for this item on the internet, please remember that "balsa" is a critical keyword you must include in the search bar-- I'm just saying because I do not want to be responsible for your internet search history.) 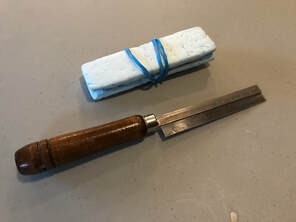 Yeah, my razor saw is a bit rusty. Yeah, my razor saw is a bit rusty. Thin Razor Saw Balsa can vary in thickness and in density, and when it comes to cutting dense balsa (or in a cross-grain direction) it can be a bit challenging. Therefore, instead of using your hobby knife and making multiple cutting passes to get through it, a razor saw may do the job much better and quicker. If you get one of these, I recommend one that has a lot of teeth per inch. I think the one I have is around 52 TPI. If you have fewer teeth, the balsa may have a tendency to crumble underneath the blade and not cut easily. The key is understanding how the teeth are angled. They mainly cut on the pull stroke, so when I start a cut, I gently apply a couple of push strokes to score the wood. This ensures my cutting groove is started before applying both push and pull strokes. Anyway, you can find these at your typical hobby stores and they'll probably cost you $12+ dollars. For some reason, they do not come with a blade protector! Seriously, what's up with that? Is it too much to ask? Sheesh... I use some scrap styrofoam to cover my razor saw blade when it is in my toolbox. 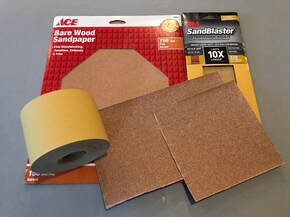 Sandpaper of various grits Sandpaper of various grits Sandpaper When working with wood, you're going to need a way to shape your airfoil and sandpaper works easily with your balsa material. Sandpaper can come in different sheet sizes (mainly to fit different size tools and sanding blocks) and it comes in a wide variety of "grit." The grit is a number (e.g. 80, 100, 150, 320, etc.) and it represents the size of "sanding particles" that's on the paper. The smaller the grit, the bigger the sanding particles and the higher the grit, the finer the sanding particles. The typical sanding process is that you use a lower grit to sand away the material more quickly (more roughly) and then you work your way to a higher grit to achieve a progressively smoother surface. But, I'll be honest with you, when it comes to me building my small 12-18 inch balsa gliders, I just use the 150 grit. I seldom go a second round with higher grit. Also, if you use 80-100 grit, you run the risk of over sanding, and before you know it, you'll have messed up your airfoil. The hardware store might be your best bet for sandpaper (e.g. Menards, Lowe's, Home Depot, Ace, etc.) So, shop around and find what works for you. I have even recently shopped Amazon and splurged on a roll of good 150 grit sandpaper that has a sticky backing-- I love that stuff and it's great for my homemade sanding blocks... which is our next topic. 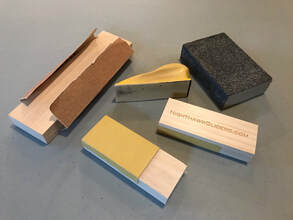 A number of sanding blocks A number of sanding blocks Sanding Block I would strongly suggest that you do NOT sand your airfoils without using a sanding block. Don't even try unless you desire an inconsistent thickness across your airfoil. A sanding block will provide you with the rigidity you need for a consistent and level sanding stroke. So, before you get some sandpaper, think about the sanding block you will be using. Me? I like using the simple tried-and-true block of wood. I'll wrap my sandpaper around it and it's a done deal. I cut my own blocks from select pine. Since I work mainly on small gliders, I like my sanding block to be light and small. Now, if you search the hardware store, you'll see a wide variety of sanding blocks; many of them are rather large, heavy, and a bit unwieldy for detailed work. Also, you may find some of those "foamy" type sanding blocks. Just be aware the foam blocks can flex if you push down too hard on them. A solid block is the better choice. Or, you can just make your own, like I do. 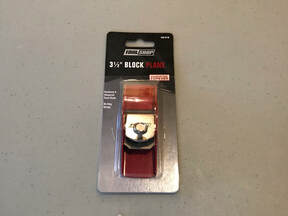 Apparently, I'm not using this one yet! Apparently, I'm not using this one yet! Small Block Plane In my opinion, this tool becomes helpful for larger, more ambitious projects-- say for those airplanes you build with a wingspan greater than 18 inches or you need to shape an airfoil that is 1/4 inch thick or more. What does it do? Basically, it whittles off paper-thin strips of wood one stroke at a time by using a sharp steel blade. It's faster than sanding, but to be honest, it can take a little getting used to. The problem is that you can easily shave off too much material accidentally. So, you need to be careful using it. Once you get the hang of it, it becomes easier to use. After using this tool, you'll still follow up with a light sanding session. This tool is found in hobby shops and in some hardware stores. 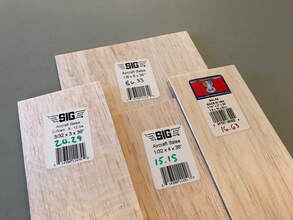 Popular in the USA are Sig and Midwest Popular in the USA are Sig and Midwest Balsa Wood When building aircraft, balsa is the wood of choice. It's such a fantastic material... however, finding quality balsa can be frustrating at times! I must warn you, especially if this is your first quest searching for good balsa, it matters a lot where you get it and it matters even more in what you select from the bins. First off, save yourself some time and go directly to your local hobby shop (such as Hobbytown USA) and avoid the "craft" type stores (such as Michael's, JoAnn Fabrics, or Hobby Lobby.) Nothing against the "craft" type stores in general, but when it comes to balsa, they often have a limited selection, their product is typically more expensive, and the stuff on their shelf is often damaged due to slow product turnover. The best hobby shops have lots of bins of neatly-stored balsa and a frequently replenished stock. Next, you should pay attention to the quality of wood. You'll want good, flat sheets having a consistent wood grain across the whole sheet. This is important for a well-balanced glider. I'll hold it up to the lights and inspect the wood grain for consistency. Finding the appropriate density and understanding wood grain will come with experience. In fact, i'll have to consider publishing another blog on this very topic! You could also order your balsa online from a major supplier (such as Sig Manufacturing for example) but, you will certainly pay shipping cost unless your purchase a huge bulk just to get the free shipping. Good luck on your quest! 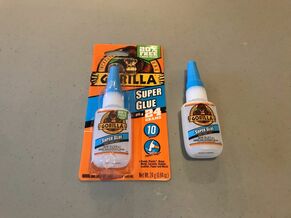 Future Sponsor... I can dream, right? Future Sponsor... I can dream, right? Super Glue (Cyanoacrylate) Now that you have all your parts cut out and sanded, you'll want to use good old fashioned Elmer's wood glue to assemble your airplane. Naaa... I'm just razzing ya, we don't have time for that! Thanks goodness for Super Glue (aka CA Glue or Cyanoacrylate) because it is an "instant" set adhesive that works great with balsa. However, if you go into a hobby shop and look over the CA glue selection, you might just scratch your head because there's thin, medium, thick, and gel-- "what's the difference," you ask? Plainly put, the thinner the adhesive is, the quicker it dries. The thicker it is, the better it is in filling "gaps." In short, I find medium CA glue to work best on my balsa airplane projects. In fact, I would even say that the Gorilla brand Super Glue is my favorite. You can conveniently find Gorilla Super Glue in hardware stores and even in some grocery stores for $5-6. However, when comparing prices, pay close attention to the Net Wt. in grams per unit cost. For example, I've seen the Gorilla Super Glue bottles come in 15g, 20g, and (20% more free) 24g sizes. Just pay attention that the physical size of the bottle is the same regardless of the quantity of adhesive within them! Post note: Gorilla is NOT a sponsor-- so, I just wanted to clearly state that here. I mean, you know, if they wanted to be a sponsor-- like if they asked us or something-- sure, we'd give it some thought. It'd be nice to have a good sponsor, right? Hey, Gorilla, if you happen to be reading this, please, please, please be our sponsor! ;-) (um... sorry about that, folks... and now back to our regularly-scheduled blogging...) 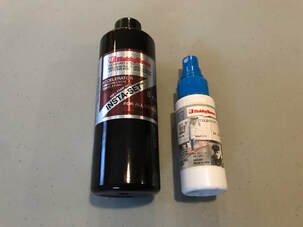 CA Accelerator in spray and refill bottles CA Accelerator in spray and refill bottles CA Glue Accelerator Even though CA glue sets very quickly-- as in a matter of seconds-- it may take hours to fully cure. That's where the magic of CA Accelerator comes into play. It works on adhesives that have "cyanoacrylate" as an ingredient. If you're just building an airplane or two, I'll be honest and say CA accelerator is NOT a mandatory product to have. Unfortunately, it's a bit costly and is not worth it if you just have a couple of projects. But if you are a hobbyist and you build all the time, then this stuff is great! After gluing your parts together, you just apply a drop or two of CA Accelerator and it fully cures in a matter of seconds. At the hobby store, a small 2 oz. spray bottle might cost around $5 and a large 8 oz. (refill) bottle around $15+. Another tip: If you don't have CA accelerator, just use your humid breath and breathe on the glue joint for a while. The humidity will help accelerate the drying time. 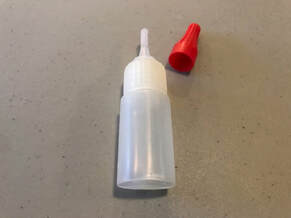 Squeeze bottle for CA Accelerator Squeeze bottle for CA Accelerator Squeeze-Bottle w/ Tip Applicator Ok, this is also an item that is not technically essential, but I do recommend it because I am NOT a big fan of the CA accelerator spray bottle. When I spray that stinky stuff on my glue joints it goes everywhere-- on my fingers, on my table, in the air, and I mean everywhere! Therefore, it's a good idea to find a good little bottle with a fine tip applicator, fill it up with the CA accelerator. That way, you can apply the accelerator more precisely by placing a drop or two on the glue joint. You can find other types of bottles with a fine metal tip, but what I have works just fine. Also, for some reason, these little bottles are more expensive than they should be! Why? Well, I think after you breathe this odoriferous CA accelerator for the first time, you quickly realize $10 for a bottle might be an appropriate sacrifice. I suppose that's how they get ya. Perhaps, in the end, it may have paid for itself since I'm no longer wasting so much accelerator by spraying it on everything else but my project. Trust me! When it gets on you, it does not double as a good cologne! 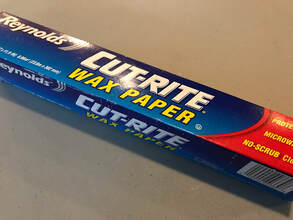 A good brand of wax paper A good brand of wax paper Wax Paper Pretty much without fail, super glue will undoubtedly fuse your fingers together faster than you can blink an eye-- after all when super glue was invented, it was used on the battlefield to quickly close wounds. History aside, it does have a weakness and that weakness is your everyday common wax paper. Since super glue will not stick to that, it becomes the perfect protective layer between your freshly-glued project and your table. Sure, you'll still glue your fingers together, but at least your project will not stick to the table! For that alone, wax paper is a MUST have and should ALWAYS be used while gluing parts together. Most hobbyists know this fact, but just in case you didn't, you're welcome! Just stick with the better quality brands and you'll be fine. I once purchased a cheap brand that was a bit skimpy on the wax coating-- so, beware. 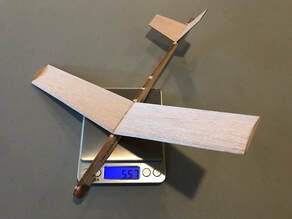 Nice scale with back-lit lighting. Nice scale with back-lit lighting. Digital Scale Alright... moving on-- The next useful item is a digital scale to measure weight. Again, perhaps a non-critical item to have... however, if you are building lots of gliders, or if you are building for competing, it's good to know the overall weight of the airplane parts and also the final weights of the gliders. If you search Amazon, for example, look for "digital kitchen scales" and you'll find a boatload of them to choose from. You can find some fairly inexpensively and I especially like those that can measure to a 1/100th of a gram. I think when I bought mine, it cost me around $12. You can weigh the option of buying one or not and decide for yourself! (See what I did just there? Sorry, that was punny!) 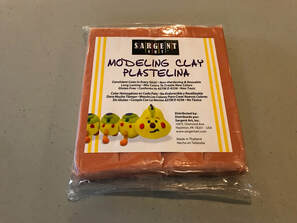 Non-hardening modeling clay Non-hardening modeling clay Modeling Clay (Plastelina) For the nose weight on our gliders, we like to use Plastelina-- which is non-hardening modeling clay. This stuff is very easy to work with and you can add or remove clay from your model as you see fit. I always have a little plastic container of this stuff in my pocket when I'm flying my gliders or I'll have some stuck to my launch handle in case I need to make a CG adjustment on my glider. To be honest, there is a downside to this stuff. It's temperature sensitive. The hotter the day, the softer and sticker it gets-- especially if it sits in the direct summer sunlight. But, what ev's... Keep them shaded and they'll be fine. You can purchase this stuff by the pound for around $4 or so... which is a LOT! I get this at a local supply store called United Arts & Education, I think you can also find Plastelina in the typical big box stores and most likely online as well so search around. 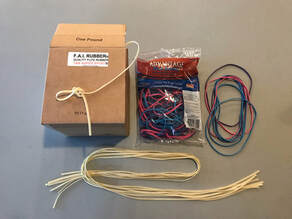 Rubber bands for catapult launchers Rubber bands for catapult launchers Rubber Bands When we launch our catapult gliders outside, we use rubber bands that are 1/8 inch wide and we have a couple of options. Typically, we use some 7-inch long file band loops as our default go-to. The product we use is the Alliance Advantage brand Rubber Bands #117B and you'll find them at Walmart for less than $4. These are just office file bands and bag of these has an assortment of three fun colors: blue, pink, and purple... because, who doesn't need a little color in their life? But, when we really want to push our gliders to the limit, we'll use the premium hobby-grade stuff: FAI Tan Super Sport Rubber. We'll make a launcher with a double loop 9 inches long and that will make our gliders sky-rocket! I highly recommend visiting the Volare Products website (volareproducts.com) as the place to purchase some FAI Tan Super Sport Rubber. Now, if you are building a glider for indoor flying, 1/8 inch is way too thick... try something smaller like 1/16 inch. You'll have to experiment based on your glider weight and ceiling height to find the best fit. On a side note: If you are building rubber-powered (wind up) airplanes, you gotta go with the FAI Tan Sport rubber because the file bands will not work at all! 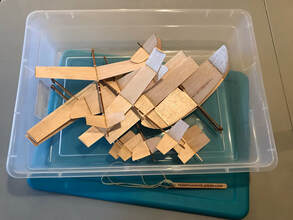 A well-organized tub-o-gliders A well-organized tub-o-gliders Storage Box Now that you have your gliders built, you might want a nice way to carry them to the park or you need a good sturdy container to store them for safe keeping. There's nothing simpler than a plastic storage container. I gotta say my favorite is the Sterilite brand 28 Qt. container-- it's 23" L x 16 1/4" W x 6" H. You can easily throw in six or eight gliders in there. Also, since we often fly into the early evening hours, dew can start to drop. Therefore, these plastic containers are crucial in keeping our gliders well protected from the dampness. Search your local hardware stores and find these or something similar that works for you. I actually found some at our local grocery store, Kroger, for about $8. A good investment to protect your precious gliders! 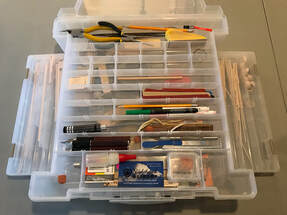 My not-so-organized toolbox My not-so-organized toolbox Toolbox Ok, the last thing you may want to consider is finding yourself a handy-dandy toolbox that can hold all of your building gear. You'll be a happier person if you can have a tackle box, a storage box, or anything to keep your things neatly organized. I searched and searched to find the best box I could find... and lo and behold, I found this gem of a box! Luckily, I found it at JoAnn Fabrics many years ago and I think it may have cost me $40-- so, yikes! But in hindsight, it is well worth it! I love this thing and the many-many adjustable compartments it has. I'm curious if it still available in the store? Hmm... I doubt it is. Anyway, I'm not the most organized person by far so I just randomly toss all my junk in the box. Every time I look at it, it gives me a guilt trip about how completely unorganized of a person I am. (Sigh!) In Conclusion...
The handful of things that you really, really need are...
We hope you have a great time building and flying your balsa gliders and if you are interested in building our Sandpiper 12 CLG from scratch, check out our easy-to-follow video tutorial here: www.nighthawkgliders.com/build Enjoy flight and enjoy life, my friends! Brad
9 Comments
Ola Rantala
1/16/2019 03:17:14 pm
"you know, just in case the U.S.A. decides to go metric. (Yeah, right! That'll never happen!"
Yeah, I'm guilty of this, I measure my glider parts in inches instead of centimeters... mainly because the balsa sheets we get are measured in inches. However, I do like to weigh my gliders in grams instead of ounces. I have also, in a few of my videos, provided both measurements. But, I must be careful with the conversions, for I even messed it up once before by accident... so, yup!
Kyle Kroker
2/2/2019 11:05:40 pm
This is wonderful of you guy's to put such valuable info on the work space and tools needed.
Brad
2/6/2019 10:28:04 am
Hi Kyle! Thanks for commenting, Martin! Our main goal is to inspire others to start building! We especially love to hear that you and your children will be sharing this great experience together. I believe our Sandpiper 12 is a perfect tutorial to get you started. As, always, you're welcome to share your building and flying moments with us online and/or via email! And we'll be here to help you along the way, should you have any questions! Have a blast, my friend!
ted bergner
5/3/2019 10:37:12 am
your jig to set wing angles. where can I get one or how to make one?
Max Campbell
1/13/2022 02:30:18 pm
Took delivery of my digital scales today, .01g sensitivity! Will be keeping records of component weights from now. Leave a Reply. |
AuthorBrad Williamson, co-creator of Nighthawk Gliders, enjoys learning about the many aspects of flight and aeromodelling-- especially when it involves free-flight gliders made from balsa wood. From 2012-2016 he helped coach Science Olympiad teams for a local middle school. In the state of Indiana, his students placed 1st in rotor egg drop, 3rd in Balsa Gliders, and 3rd in Helicopters. Since then, Brad was hooked on building and flying things made from balsa. His contributions here stem from his love around the hobby of flight and his desire to be creative and share information. Along with his brother, Bruce, their goal is to inspire a new audience (be them young or old) to simply "enjoy flight and enjoy life!" Archives
August 2020
Categories |
 RSS Feed